How To Capture Stunning Photos On Your Everest Base Camp Journey
Taking the most incredible photos on your Everest Base Camp trek is a great way to remember the amazing scenery and moments of a lifetime. The Everest region is filled with some of the most spectacular and breathtaking scenery, from towering snowy peaks, colorful Sherpa villages, to local, vibrant culture. For a trek like yours, especially if you want to tell the story of your journey in a special way — maybe not wanting to shoot like I have every trek I’ve done — you’ll need to be prepared and know how to work with the unique environment and light of the Himalayas.
One of the initial steps in taking great photos is to have the proper equipment. Although smartphones now feature great cameras, you’ll still find more control and better quality if you use a lightweight DSLR or mirrorless camera with interchangeable lenses, especially if you are into landscapes and low light. A wide-angle lens is a good option for mountain scenes, while a zoom lens will make distant mountain peaks and wildlife more prominent. And don’t forget to bring extra batteries and memory cards; the cold will drain batteries more quickly, and you will want as much storage as possible for all your shots.
You should time your shots to leverage natural light. The best light conditions are in the early morning and late afternoon (often referred to as the golden hours), when the sun gives a warm, soft glow and casts long shadows to add depth and texture to your photos. Mid-day light can be brutal and create sharp contrasts, so use that time to concentrate on details, or local villagers, artefacts , or macro shots of plants and small wildlife. Cloudy days also mean beautifully diffused light, perfect for portraits or close-ups with no harsh shadows.
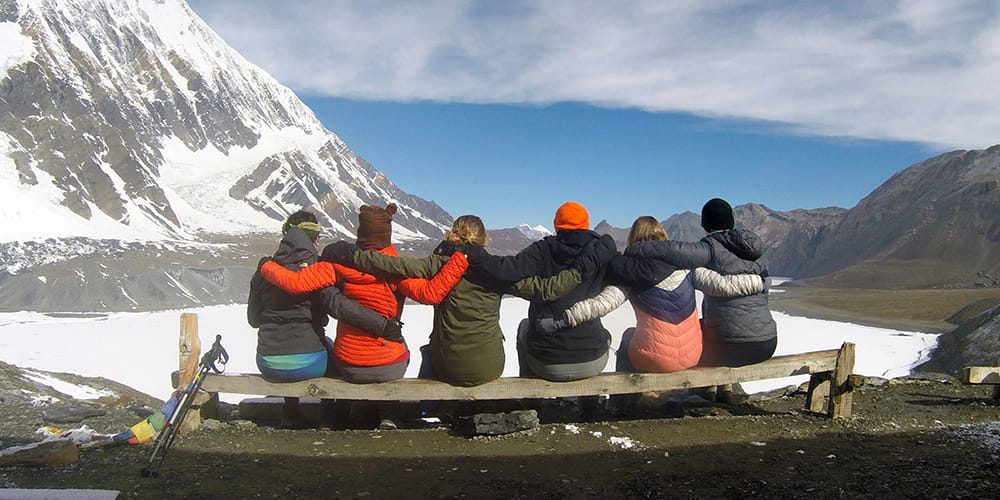
Composition is an important aspect of ensuring your photos are eye-catching. Photograph key objects off-centre and according to the rule of thirds for aesthetically pleasing composition. Use natural frames such as doorways, trees, and rocks to make your pictures look interesting. Adding people to your photos not only gives a sense of scale when faced with such grandeur, but it also helps to tell the story of the human interaction with this rugged land. Unposed pictures of Sherpas, trekkers, and local rituals provide you with real cultural memories.
Don’t forget to protect your camera from the weather. The condensation and cold can be damaging to electronics at high elevations. Lugged on bonus cards and wrapped in your gear.r Free Weather sealed bags or Wards and Hug to your body,dy untreated if we’re not shooting, Stay in the adv viii. Wipe your lenses from time to time to prevent dust and fingerprints from impairing visibility.
Last (but certainly not least), be patient and observant. Some of the best shots happen when you wait for something to happen — a passing cloud, a moving light pattern, an unusual interaction with locals or wildlife. Spend some time working on different techniques and viewpoints rather than just rushing through the walk. This photo exercise will help you take photographs that are as visually appealing as they are compelling.
With the combination of good preparation, knowing how to use lighting and composition, and respecting the environment and culture, you can record the breathtaking scenes that speak volumes about your Everest Base Camp trek. These will be cherished memories and will also encourage others to look towards the mesmerising beauty of the Himalayas.
What’s the Best Camera Gear for Photographing Everest Base Camp?
Here is the essential camera gear you must pick for capturing such dream images of Everest Base Camp. However, as good as smartphone cameras have become, spending a little extra on a light DSLR or mirrorless camera can make a world of difference to your photos, giving you more control over exposure, focus, a nd lens choice. You’ll need a wide-angle lens for sweeping mountain vistas and a telephoto lens for closer shots of distant peaks or wildlife. Bring a solid tripod for those low-light situations, like during early mornings or evenings. Spares of both batteries and memory cards are crucial, as the cold temperature will drain your batteries extremely quickly, and you will probably take hundreds of photos. It’s also important to protect your gear from the weather—stay covered by using camera rain covers or padded waterproof bags to protect from snow, dust, and moisture. As always, achieving the right gear to portability balance is important, as you’ll be walking long distances at high altitude. Ultimately, the best gear for you is what feels comfortable to carry and use to document your own Everest in images.
How To Utilize Natural Light In My Everest Trek Photos?
Your photographs will be heavily impacted by natural light, even more so when in an exposed mountainous location such as Everest Base Camp. The golden hours (just after dawn and right before sunset) can bring warm, soft light and long shadows that give dimension and texture to your landscapes. The peaks do glow with such rich colors at these times and are ideal for making unbelievable panoramic shots. Midday light is harsher and can lead to strong contrasts and washed-out details, but it can still make a good time to photograph local life, colorful prayer flags, or close-ups where shadow detail is less important. Lights are well diffused on an overcast day, thereby cutting down on harsh shadows, perfect for portraits or macro photography. By training your eye to notice how the light is changing and adapting your shots accordingly, you’ll also be a better shot framer. Whenever the weather’s changing, keep your camera handy because stormy skies and moving clouds make dramatic backdrops. When you learn about and work with natural light, your photos will move beyond snapshots to genuine visual narratives.
Which Elements of Composition Work Best in Mountain Photography?
Composition is the magic to nice-looking photos on your Everest Base Camp trek. Perhaps one of the best techniques is the rule of thirds, in which you envision your frame divided into nine smaller equal sections and position significant elements in your photo along those lines or points of intersection to create balance. Pointy stuff like trails, rivers, or ridges guides the viewer’s eye into the scene, and makes it look less flat. Using natural frames, the doors of a hut, or the trees with a clearing, or rocks, can give your subject context and focus. Adding people to your pictures gives scale to those sweeping mountain landscapes and allows viewers to tell a better story. Any symmetry or patterns found in nature, like prayer flags repeated or terraced farming, produce dramatic photos. Do not be afraid to play with viewpoints, photographing from low, or looking down can uncover interesting angles. By using these methods, your images will become epic souvenirs of your Everest experience.
How Can I Keep My Camera Gear Safe and Secure in the Tough Terrain of the Himalayas?
Everest Base Camp Tour The equipment of a camera can struggle when exposed to this environment in the Himalayas, with freezing conditions, a lot of moisture, and dust. The best protection for your gear begins with shooting cameras and lenses that are weather-sealed, if you can. Bring a rugged, waterproof camera bag with padding to protect from drops and weather exposure. When not in use, keep the camera next to your body to avoid losing battery life and condensation. Keep silica gel packs in your camera bag to soak up excess moisture. Avoid switching lenses outside to avoid dust and dirt on your camera body. The lens can be cleaned with a small microfiber cloth. Don’t forget your camera cover or a plastic bag if you’re taking photos in the snow or rain! Keeping these precautions in mind helps keep your gears working properly on your trek, and you don’t miss documenting your moments when you come across something beautiful.
How does adding people make my Everest Base Camp Photos stand out?
Having people in your Everest Base Camp photos gives a sense of scale and emotional depth to the incredible surroundings. The human subjects are there to give a perspective of the grandeur of towering peaks and deep valleys. Taking photographs of Sherpa life, local festivals, nearby trekkers, or travel companions is natural storytelling and cultural context. Candid images often capture better the emotions and connection between people than posed portraits, so treat your subjects well and watch for their natural responses. Pictures of people in their traditional dress, with prayer flags or prayer wheels, add texture to your photo narrative. The relationship that people share with nature is one of the fundamental lessons that can be learnt from the Himalayas. Remember to obtain permission before snapping pictures of people, particularly in villages, in order to safeguard the local culture and privacy. Adding people changes your shots from landscapes to stories that represent the human spirit of the Everest region.
When Are the Best Times to Take Photos on the Everest Trek?
Everest Base Camp Hike The morning and late afternoon are the ideal time to photograph on your EBC trek, we call it the golden hours. Early mornings – sun rise on the Himalayas is a soft, golden yellow light that warms the mountain peaks and gives wonderful long shadows. This light brings texture and drama to landscape photographs, particularly the iconic peaks of Everest, Lhotse , and Ama Dablam. Towards the end of the afternoon, the sun sets behind the mountains, casting warm directional light on the sky and landscape, which increases the saturation of the color and accentuates side-light or contrasts. Midday light is generally flat and harsh, and the sun’s position directly overhead can wash out details, so while it’s not as great for sweeping vistas, it makes for good light for portraits and close-ups. Occluded or cloudy conditions offer soft, balanced lighting, which is ideal for taking softer, darker-hued pictures without harsh shadows. Knowing these lighting conditions and shooting during them will allow you to use the natural beauty around you to produce more professional and dramatic photos.
How Can I Photograph the Culture of the Everest Region?
Everest Base Camp Trek Itinerary To show the cultural personality, the landscape meaning, and the real people of the Khumbu and Everest region in your still and moving images. The region is home to Sherpa culture, Buddhist traditions, and lively festivals. Capturing monasteries like Tengboche or Pangboche with their ornate style of building gives a peek into the local spirituality. Iconic symbols, ‘prayer flags,’ which flutter and whip in the wind, as a symbol for blessings and peace that one can work creatively into compositions. Images of Sherpa people in their traditional clothing and going about their daily lives, such as yak herding, cooking, or sewing, add authenticity to your cultural education. Festivals such as Mani Rimdu provide striking photo opportunities with their colorful costumes and rituals. Always treat cultural subjects with the greatest respect and ask for permission before photographing people. When you interact with locals, it could lead to authentic reactions and wonderful moments, making your story more emotive. These cultural elements counterpoise the mountains’ majestic natural beauty with the human spirit that is the essence of the Everest region.
How to Ideal With the Battery Life and Storage While On Trek?
Managing battery life and storage can be crucial while shooting in remote locations such as Everest Base Camp. Batteries drain faster in cold weather, so bring plenty of backups and stash them inside your jacket close to your body to keep them warm. Disable Wi-Fi and Bluetooth when they’re not in use to save power. Use Airplane Mode if you don’t care about cellular signals. All the images and videos are stored on a memory card (or several, so you don’t run out of space after one or two shots or takes). And when internet access is available, you should regularly back up your photos to a portable hard drive or laptop, or even to the cloud. Categorize your files daily, it not only saves you from accidentally deleting all files easier to find certain shots at a later date. If you want to charge your phone or smaller gadgets, it can be worthwhile to bring a smaller power bank, but bear in mind that you won’t have regular access to electricity along the trek, so you will need to decide when to use it. With enough power backup and storage, you will not have to worry about missing those breathtaking 3 am sunrises while you climb Everest.
How Does One Capture the Grandeur of the Himalayas?
To catch the immensity of the Himalayas requires tricks that also convey the large and overwhelming. A wide-angle lens will also include sprawling mountains and valleys in the shot, making everything feel open and large. Even foreground elements such as rocks, prayer flags, or trekkers can bring depth and draw the viewer’s eye into the scene. Shooting from high angles, on the other hand, offers a perspective that sees layers upon layers of peaks and ridges disappear into the distance. Panoramas that are stitched together can show stunning 180- to 360-degree views. The contrast between shadowed valleys and sunlit peaks plays with dimensionality. Atmospheric details such as mist, clouds, or dynamic weather also add to the sense of scale and mood. By playing with various focal lengths and compositions, you can convey the stunning beauty and rawness of the Himalayas in your images.
How Do You Tell a Story With Your Everest Base Camp Photos?
By storytelling through your Everest Base Camp Trek package photos, it goes from being just images to sensations and stories. Begin with a lot of shots of different things and start taking wide landscapes, detailed close-up shots, and candid portraits showing both the environment, people, and culture. Sequence your images to tell the story of your climb — starting from your home and ending with summit views of your goal. Emphasize your emotional feelings you get, such as how hard it was to climb up the steep passes, how nice it was to drink tea with the locals, or how overwhelming the view was to watch the sunrise at Everest. Draw on recurring elements like prayer flags, mountain shadows, or Sherpa customs for continuity. Whatever you see fit as a caption or brief description for your pictures is a way to give context and reflection. Creating a photo essay to tell the story for you and readers/viewers to see the adventure you lived, and for your recollections of it to be meaningful.
How Challenging Is Everest Base Camp?
The Everest Base Camp hike is classed as moderate in terms of difficulty; it is high in altitude, has long walking days, and covers a variety of terrains. You don’t need to know how to do technical climbing for it, but it can be very challenging physically. During a trek, trekkers usually have to walk 5 to 7 hours every day over steep, rocky terrain, roughly 8 to 15 kilometers. The one difficult thing is acclimatizing to the altitude, which is high — Everest Base Camp is situated at a little more than 5,364 meters (or 17,600 feet) above sea level, where there is far less oxygen than at sea level. Even well-conditioned individuals can be susceptible to altitude sickness when not managed appropriately. Physical fitness, previous trek experience, and acclimatization are paramount. Mental endurance matters since the journey can be grueling and mentally taxing because of the weather and the isolation. But with good preparation, moderate pace, and understanding of the altitude risks, most healthy trekkers will be able to go through it. The stunning sites, the amazing cultures, and the accomplishments all make it worth it!
What Do You See When You Look at Mount Everest?
To see Mount Everest as clearly as possible, time your trek so that it lands at certain viewpoints. Kala Patthar (5,545 meters), a brief hike up from Gorak Shep, is one of the most famous, providing a spectacular, unobstructed and panoramic view of Everest’s summit, as well as nearby peaks such as Lhotse and Nuptse. Golden hour is the perfect time of day for dramatic lighting and colorful skies. Namche Bazaar and Tengboche Monastery even have views of Everest to offer among stunning scenery. A great deal can depend on the weather, with clear, crisp mornings giving you the best chance for stunning views, while clouds and fog can obscure the mountain completely. [Like this but with the apostrophes inspired by Wade]:” Wade: Put out your ideas when there is a lullPatience is a virtue, and being flexible helps as well, since you have to wait for the right moment to present your ideas. Telephoto lenses are deployed at these spots by photographers who wish to photograph Everest in detail. Turning the visual corner and seeing Everest is the highlight of the trek and is a very satisfying moment after days of hiking.
Do You Need a Permit to Go to Everest Base Camp?
Yes, you need permits for the EBC Trekking to access the area safely and in an organized way. The two primary permits are the TIMS card (Trekkers Information Management System) and the Sagarmatha National Park entry permit. The TIMS card, issued by the Nepal Tourism Board, is a requirement for all trekkers in the Everest region; it’s used by authorities to keep track of trekkers for their safety and for environmental protection. The Sagarmatha National Park permit grants access to this protected national park region, covering Everest Base Camp. Both permits are issued from Kathmandu or Pokhara at the Nepal Tourism Board’s regional office or airport, or border after you arrive in Nepal. Permits are usually organised by trekking agencies for ease. You must have your permits with you at all times throughout your trek, as park officials and police check them on the way. These permits aid in conservation attempts and protect the pristine beauty of the Everest region.
Everest Base Camp : How Much Does It Cost?
The price of Mount Everest Base Camp Tour can fluctuate enormously depending on a number of factors, including your style of trek, the time of year, and the services you use. Mean treaters will be expected to fork out about $1,200 to $ 1,500 USD, permits, flights, accommodation, food, and gear rental all included. Key costs include the round-trip flight from Kathmandu to Lukla ($150 to $200), trekking permits ($50 to $60), and daily expenses for tea houses or lodges ($20 to $40). Guides and porters are more expensive but also safer and more comfortable – guides start at around $20/$30 per day, and porters cost less. The $2,000 to USD 3,000 range is for mid-range walkers who require a bit more comfort, or private trips. Upgraded packages with improved lodgings, meals, and transportation can run more than $5,000. You may also want to budget for emergency funds, tips, and souvenirs. Planning a budget ahead of time and researching trekking operators can be beneficial to maximize your Everest Base Camp experience without any extra costs.